Literature review
Developers can easily add advanced computer vision functionality to any application, allowing it to recognize images and objects, or reconstruct environments in the real world. Vuforia enables us to detect our own image and augment virtual 2D/3D content over it. In this tutorial we’ll dive back into the Vuforia Augmented Reality (AR) library, exploring one of its most interesting resources—the Image Target.
To learn more about Vuforia library please refer my previous blog: “Get started developing AR Apps with Unity and Vuforia”
Image Targets: Image Targets represent images that the Vuforia SDK can detect and track. Any kind of image can be a Vuforia Image Target. However, the more detailed and intricate the image, the better it is to be recognized by the algorithm. A lot of factors will be part of the recognizing calculation, but basically the image must have a reasonable level of contrast, resolution, and distinguishing elements.
Use Cases: Common uses of Image Targets include recognizing and augmenting printed media and product packaging for marketing campaigns, gaming and visualizing products in the environment where the product was intended to be used.
Getting Started
This vuforia ImaeTarget tutorial is meant for newcomers to get started with developing Augmented Reality applications. In this tutorial, we are going to create our custom ImageTarget and render custom 3D model over it. In upcoming tutorials, we will focus on advanced AR applications and implementation.
Prerequisite (Tools Needed):
We will be using Vuforia AR SDK and Unity 3D engine and Android SDK for this tutorial. Make sure you have downloaded the following before proceeding further.
- Unity Engine (Version 5.6.0f3 I’m using now)
- Vuforia SDK for Unity Platform ( Vuforia 6.2)
- Android SDK & Android Studio (Optional)
- Java Development Kit (JDK)
In this tutorial again there is no single line of coding so to implement same on your mobile it’s not necessary to have coding knowledge 🙂
Step by Step Implementation
Please refer our previous tutorial “Get started developing AR Apps with Unity and Vuforia” and follow following steps to setup development environment with Unity and Vuforia.
Environment Setup:
1. Setup a Simple Unity Project [Project Name: Tutorial-3]
2. Download the Vuforia Unity Extension (Vuforia SDK for Unity Platform) [NOTE: Download only SDK no need to download any Sample]
3. Import the Vuforia SDK Unity packages inside Unity Project [NOTE: No need to import sample project]
4. Create a Vuforia’s license key for our application [Or we can use already created Vuforia Key]
5. Add a new Database and ImageTarget inside Vuforia Target Manager
- To create our custom app we need to create a database and image target.
- Login to your Vuforia developer account.
- Then navigate to “Develop >> Target Manager” and select “Add Database” to add a new database
- We go to Develop -> Target Manager tab to add a database.

- Click on “Add Database“. Assign a proper name to database here “Tutorial3“. ensure a “Device” is selected and click “Create“.
There are three types of Database to choose from:
- Device: The Database is saved on the device and all targets are updated locally.
- Cloud: Database on the Vuforia servers.
- VuMark: Database exclusive to VuMark targets. It is also saved on the device.
In this case, choose the Device option and click on create.
- Now your own database is created with name “Tutorial3” you can add multiple Image targets in a single database. Now, click on your newly created database the “Add Target” tab will be enabled.
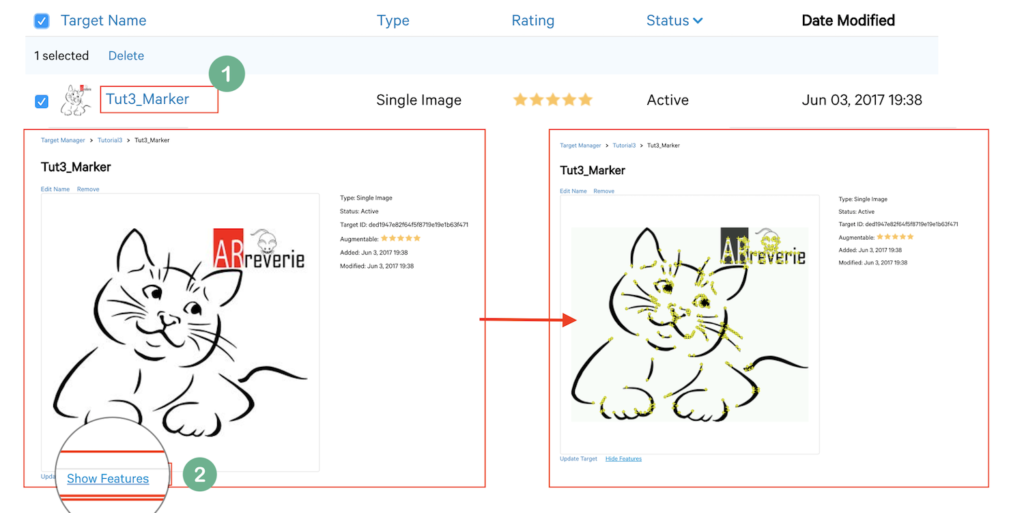
- To add ImageTarget, click “Add Target”. Give a suitable target name such as “Tut3Marker”, select “Single Image” as the type of target and other parameters as shown in the screenshot below.
- Vuforia supports lots of target types (single image, cylindrical, cuboidal, ObjectTarget, etc.). In our AR models tutorial, we’ve used a single image target and a custom image of Cat as a Tracker.
- Click here to download Image target: ARReverie CAT

- You can view your newly created target by simply clicking on its name and also visualize features. (Features decide ability of image to get detected and star rating is directly proportional with feature set)
- After uploading the image, pay attention to rating section: low rating means your image doesn’t have enough points for further tracking and/or processing. Use Show features tool to highlight those points in the image.
6. Download the newly created dataset as UnityPackage.
- Now you can download the database, selecting Unity Editor as the chosen platform.
- Again on developer.vuforia.com navigate to Develop>> Target Manager >> DB name (Tutorial3)
- Select Image Target to download (One dataset may contain more than one ImaheTargets)

At this stage, we are completed with the First stage with all required environment setup. We have “Tutorial3.unitypackage” we can call it as ImageTarget Unity package which we are going to import in our UnityScene
Actual Implementation in Unity:
1. Import Dataset in Unity Project:
Open previously (in step 1) created Unity Project and import just downloaded dataset “Tutorial3.unitypackage” into it. you can choose either way to import package “Directly double click on Package itself” OR “import custom package through unity window“.
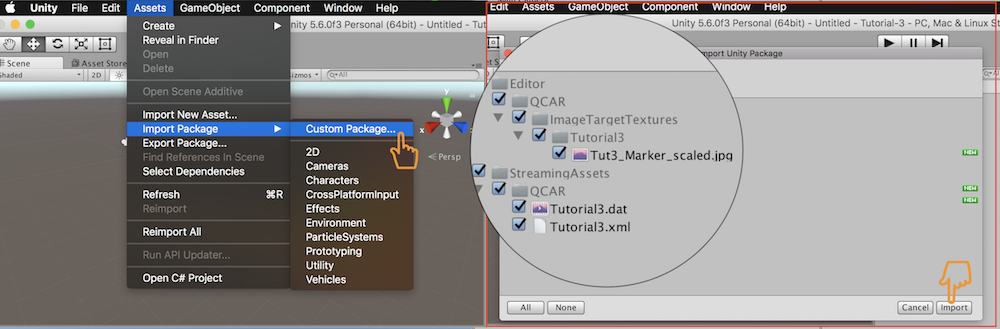
To import a new custom package:
- Open the project you want to import assets into.
- Choose Assets > Import Package > Custom Package… to bring up File Explorer (Windows) or Finder (Mac).
- Select the package you want from Explorer or Finder, and the Import Unity Package dialog box displays, with all the items in the package pre-checked, ready to install.
- Select Import and Unity puts the contents of the package into the Assets folder, which you can access from your Project View.
- There are two files inside Vuforia’s Dataset “DatasetName.xml” & “DatasetName.dat”
- After Importing UnityPackages for Vuforia SDK: “vuforia-unity-6-2-10.unitypackage” and ImageTarget: “Tutorial3.unitypackage” the unity scene will look like:

- Fix one Input error: I am having a problem where the Image Target Textures does not show up at scene view (Unity3D), It just shows white image, to solve this issue
- In project window go to in “Asset > Editor > QCAR > ImageTargetTextures > YourDB” and select “Image”
- Change Texture shape to 2D in inspector window as shown in screenshot below

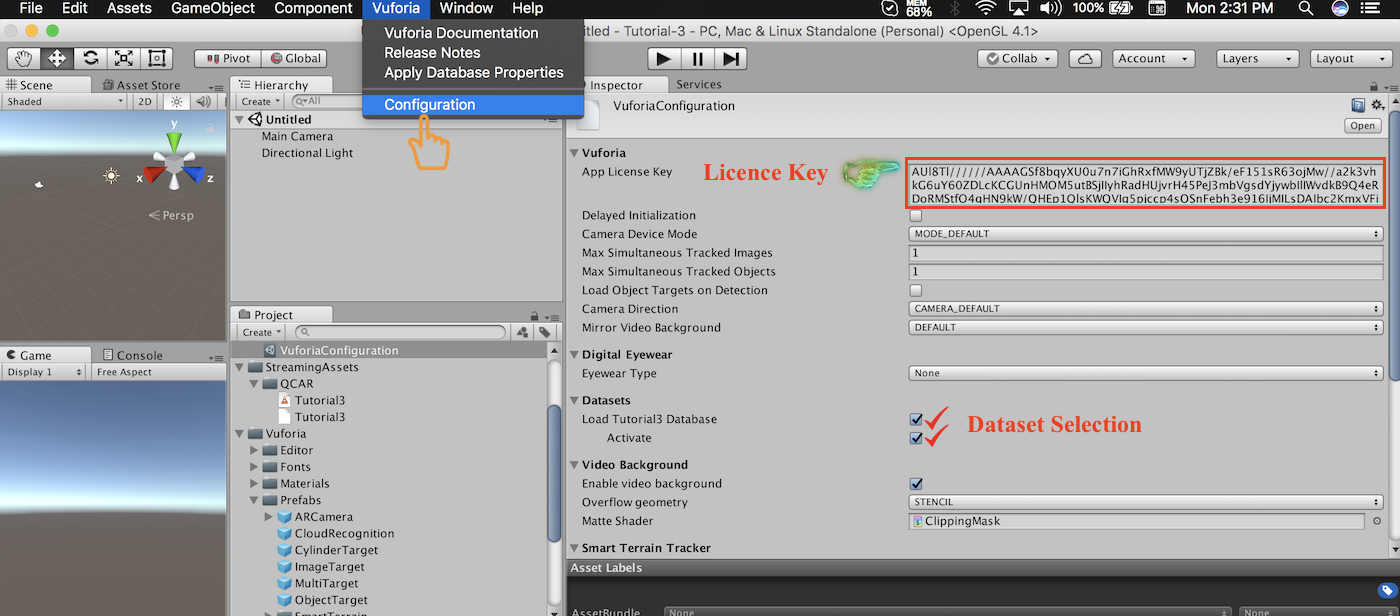
2. Configure Vuforia inside the Unity Scene (Licence key etc.):
- Inside Unity Project Navigate to Vuforia menu and tap ‘Configuration’: “Vuforia >> Configuration”
- There we paste our application license key that we’ve created previous tutorial #Tutorial1.
- Activate the appropriate dataset (Tutorial3) by selecting the option under Datasets section inside inspector window.
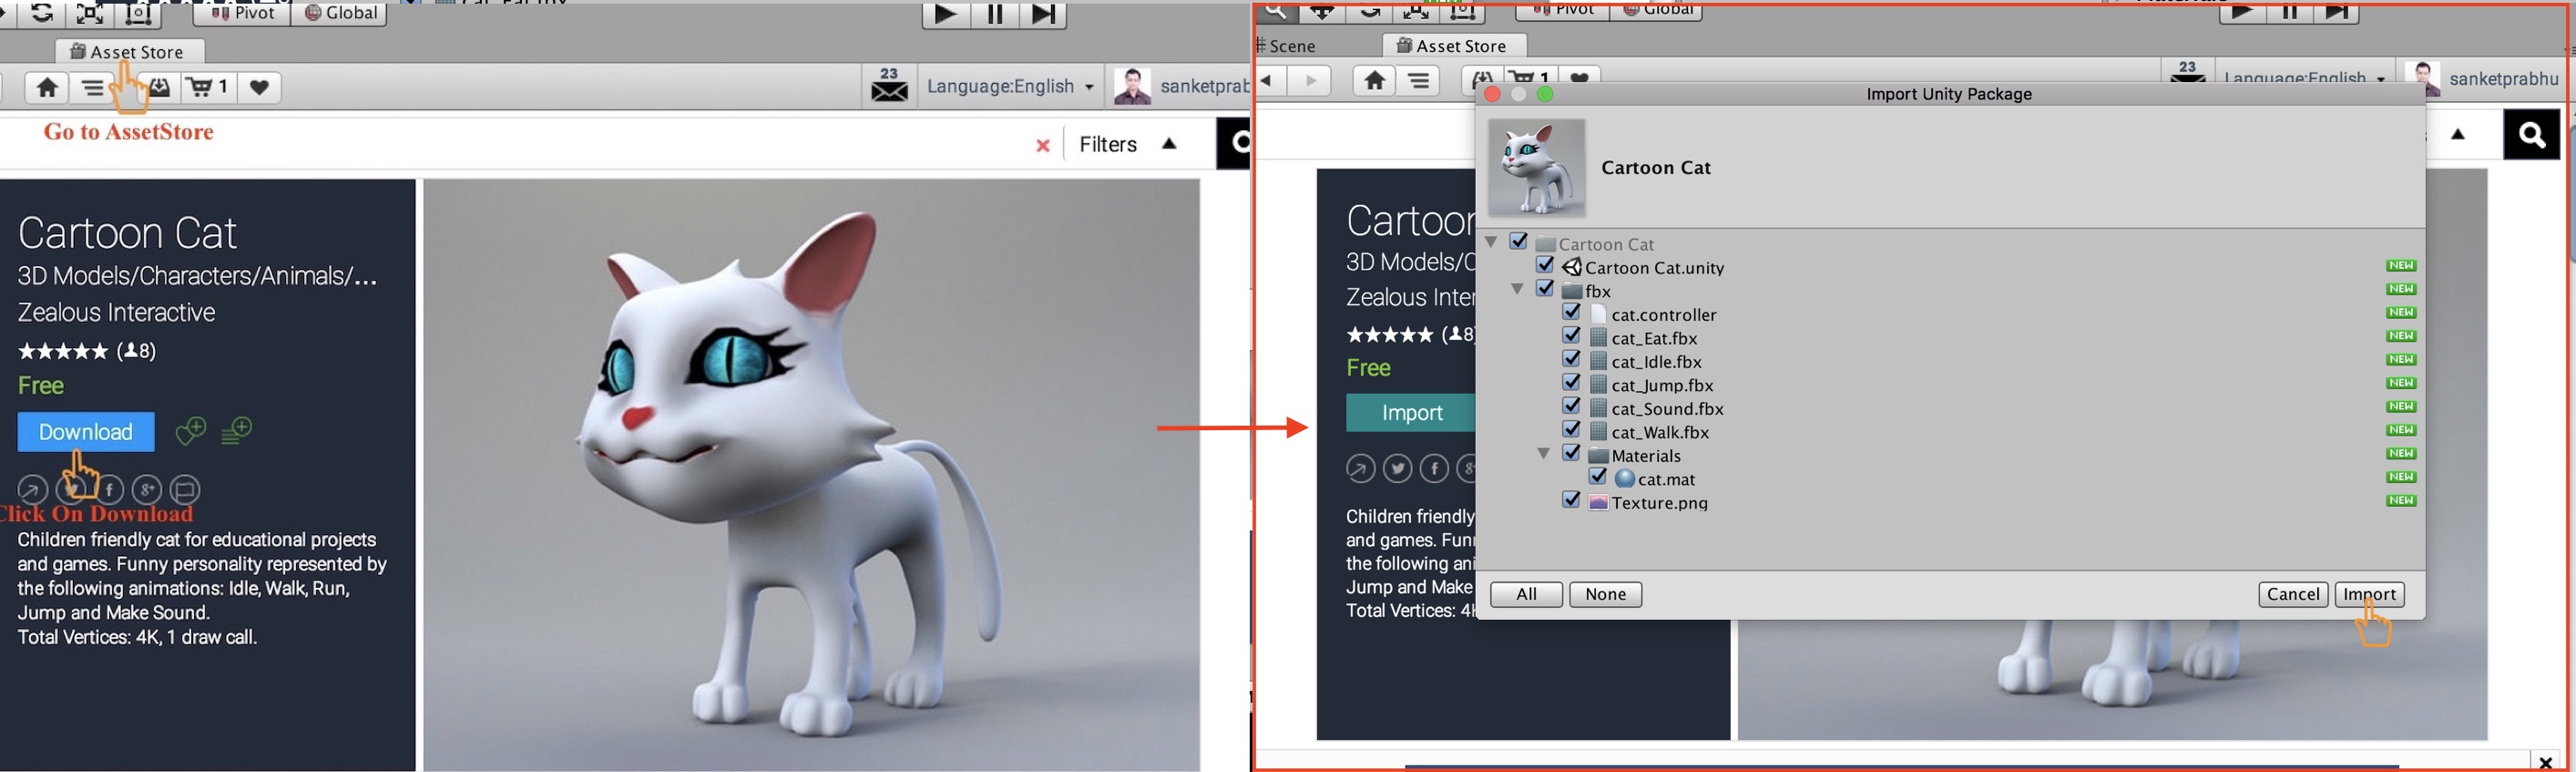
3. Import 3D model (Cat) from Unity Assets Store:
Now the fun part begins!!! let’s download 3D model with some animations for our augmented reality. For this tutorial, we choose one cute Cat from Unity Asset Store (free).
- You can open the Asset Store window by selecting ‘Window > Asset Store’ from the main menu. On your first visit, you will be prompted to create a free user account which you will use to access the Store subsequently.
- Navigate to: ‘Window > Asse Store’ OR Select ‘Asset Sore Tab’
- In Asset Store window search for the keyword “Cartoon Cat” and download the same, as shown in the screenshot below.
4. ImageTarget Scene Setup In Unity:
We are almost done with all basic requirements. Let’s create ImageTarget scene in unity and ready to fire! Check your project window in Unity. Under the “Assets/Vuforia/Prefabs”, there are “ARCamera” and “ImageTarget” prefabs. These are all we need for today.
- Remove the “main camera” from the scene (Hierarchy panel, right click and delete) and add ARCamera from Vuforia Prefabs.
- To add ARCamera, we go to Assets -> Vuforia -> Prefabs and drag the ARCamera to our scene. ‘ARCamera’ is a special Prefab from Vuforia – similar to a regular camera but with Vuforia script attached.
- Setup ARCamera Prefab: For ARCamera mauntain the Position, Rotation & Scale properties as following in Inspector window
- Position: X=0, Y=90, Z=0
- Rotation: X=90, Y=0, Z=0
- Scale: X=1, Y=1, Z=1

- Similar to ‘ARCamera’ add ‘ImageTarget’ Prefab from Assets -> Vuforia -> Prefabs
- Setup ImageTarget Prefab: ForImageTarget maintain the Position, Rotation & Scale properties (mostly default)
- Position: X=0, Y=0, Z=0
- Rotation: X=0, Y=0, Z=0
- Scale: X=90, Y=90, Z=90
- Select Database and ImageTarget Name for ImageTarget Prefab under ‘Image Target Behaviour (script)‘, in our case:
- Database: Tutorial3
- Image Target: Tut3_Marker
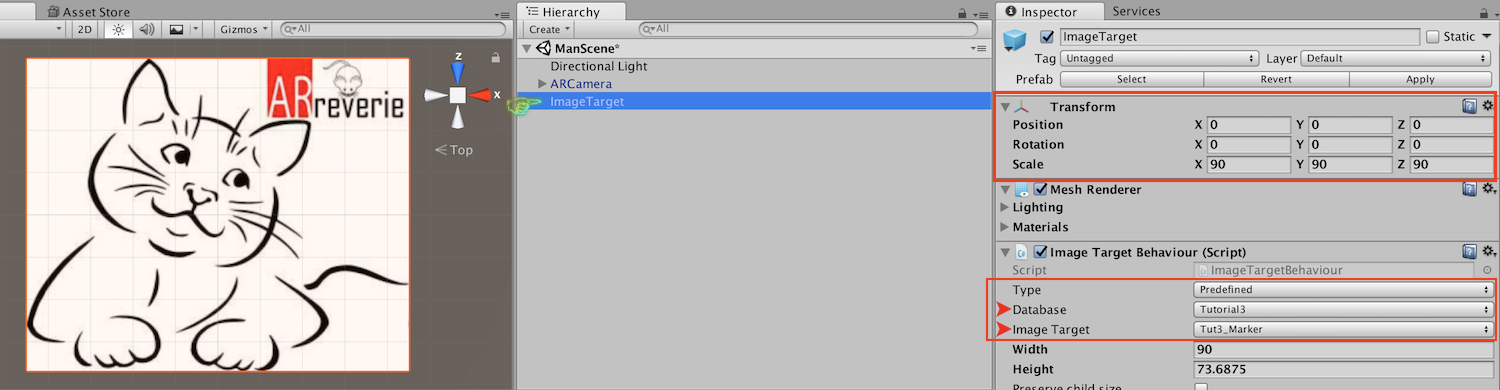
- Save the Scene with any name (here I am using “MainScene“)
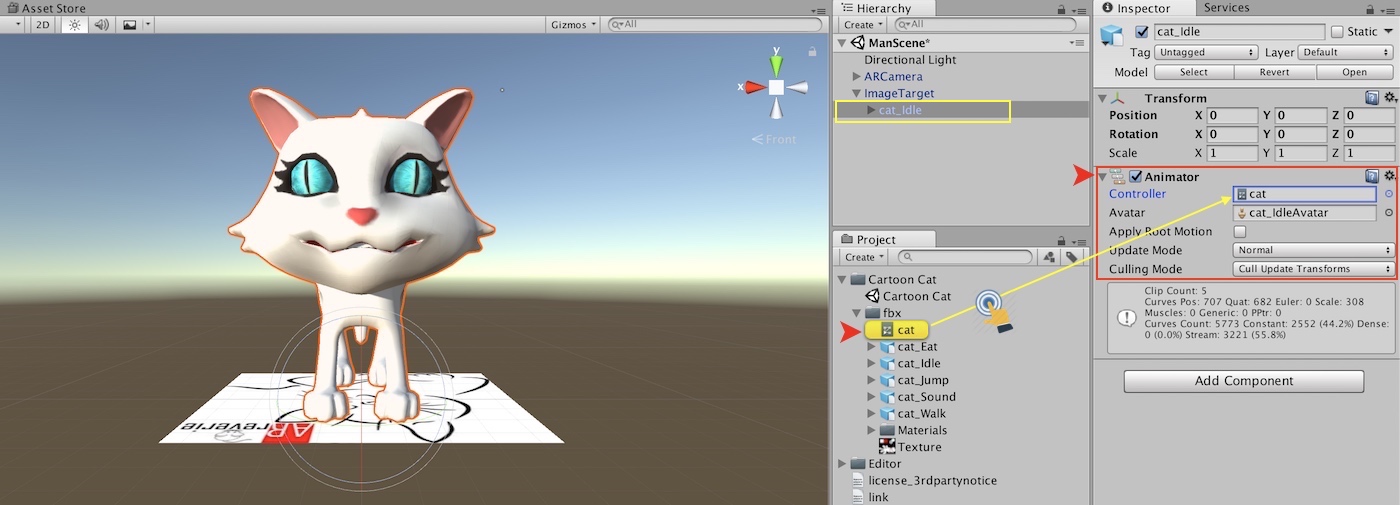
5. Add 3D model (Cat) Inside ImageTarget in Unity Scene
Afterward, we introduce our 3D model (downloaded from Asset Store) into parent ImageTarget, to do this:
- Expand ‘Cartoon Cat’ folder inside Unity Project window
- For the 3D Cat to appear over ImageTarget, it needs to be made a child of ImageTarget (can be done by just dragging theCat model prefab in the Hierarchy panel).
- Then, whenever the ImageTarget is detected by a mobile device’s camera, all the children of the target will also appear together.
- Simply Drag & Drop cat_ideal prefab inside ImageTarget in Hierarchy window.

- To add animation In project window explore through “Cartoon Cat > fbx > cat.anim” file
- Now select ‘cat_ideal’ GameObject inside ‘Scene View’ and observe inspector window for the same
- Simply drag & drop ‘cat.anim’ from Project hierarchy to Controller field of ‘Animator’ inside inspector window as shown in the screenshot below.
If we place our MarkerImage i.e Cat with ARReverie logo (Printed on paper Colour OR Black&White) and place in front of Camera View, we should see our 3D model in animation – our Cat with some animated movements.
5. Test and Deploy the Project on Android Device
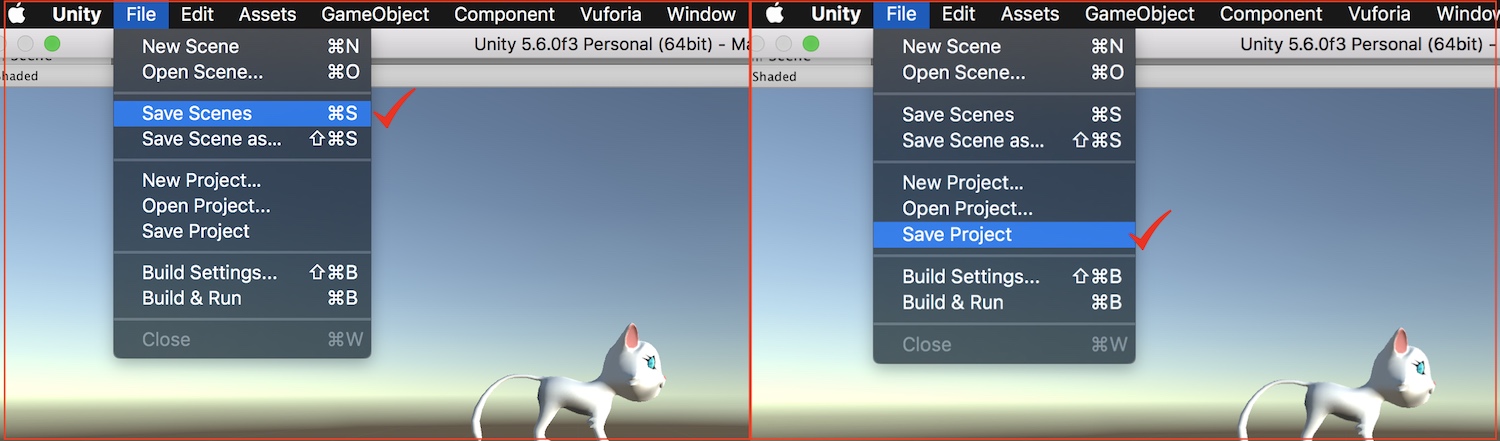
Save the scene and Project: Navigate through ‘File > Save Scene’ & ‘File> Save Project’ respectively
At this point, if we select “Run” and point a print out of the image towards our webcam,
The last step is to build the project for Android. We need to go to “File >> Build Settings”. We need to add the current scene by selecting “Add Open Scene”.
- For more guidance on ‘Project Deployment‘ please follow my previous tutorial: “Get started developing AR Apps with Unity and Vuforia”
NOTE: The AR app will work even with a black and white image of the stones because the feature points will still remain (they usually depend on other factors like gradient, etc. instead of color).
If you get stuck at any point or want to view the source code, you can find it on Github. You will just have to enter your Vuforia App License Key to build the app.
You can click on the link below to download respective content:
Best of luck everyone 🙂