Problem Statement:
By default, the Unity editor does not work well with Git. To name a few problems:
- Noise: The editor manages hundreds of temporary files. Merely opening or closing the editor will create, delete, or modify some of these files. Additionally, since it’s possible to develop on and build for multiple platforms, there are many more extraneous files than you might expect to find on, say, a Rails project.
- Broken object references: The editor keeps track of objects with randomly generated GUIDs. If these GUIDs are not committed to Git properly (i.e. via
.metafiles), the project may break when you, for example, switch branches. The more you rely on the editor, the more common and potentially catastrophic these errors are. - Unresolvable merge conflicts: Depending on your settings, the editor will save some or all of your files in binary format. If you and a team member happen to edit the same file independently – a common scenario if you use the Unity editor heavily – you will not be able to resolve the merge conflict with Git and will have to use special tools.
The Solution:
You’ll find that, in any ordinary Unity project, there are quite a lot of files and folders, good news that only three folders should be kept under source control: Assets, Packages, and ProjectSettings. The solution is straightforward:
- Add Unity-specific .gitignore settings
- Configure Unity for version control
- Proper resolving Merge Conflicts
1. Add Unity-specific .gitignore Settings
The .gitignore file is a metadata file that controls how Git operates on your repository. Files listed in .gitignore will be — like the name implies — ignored. They won’t show up in git status and they won’t be added to the repository. Set up an ignore (.gitignore, you can download from here) filter for the unnecessary folders and files.
2. Configure Unity For Version Control
Before checking your project in, you have to tell Unity to modify the project structure slightly to make it compatible with storing assets in an external version control system. This will show a text file for every asset in theAssetsdirectory containing the necessary bookkeeping information required by Unity.
- Switch to Visible Meta Files in Edit → Project Settings → Editor → Version Control Mode → Visible Meta Files.
- Switch to Force Text in Edit → Project Settings → Editor → Asset Serialization Mode
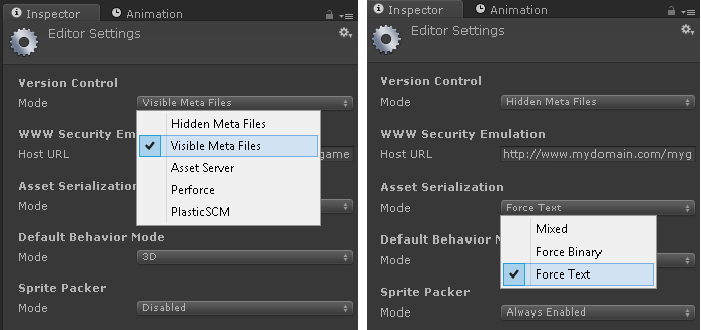
The files will have a .meta file extension with the first part being the full file name of the asset it is associated with. Moving and renaming assets within Unity should also update the relevant .meta files. However, if you move or rename assets from an external tool, make sure to synchronize the relevant .meta files as well.
To create your own source control repository please visit: Creating Your First Source Control Repository
3. Proper Resolving Merge Conflicts
Manually resolving merge conflicts between Unity-generated YAML files is very difficult and error-prone. The Unity editor is translating our commands and our knowledge into a language (the Unity YAML format) that is difficult to understand, and indeed that was not really meant to be manipulated directly.
By default, Git is totally unaware of the type of content that you’re checking in. If a file is changed in two different branches, it will try to merge the file just by looking at the lines, without understanding them. The metadata file that Git uses is called .gitattributes. In gitattributes you can configure how files are merged when two people change the same file in two different branches. This means that you can set up Unity’s “Smart Merge” functionality.
Using Unity Smart Merge
Unity incorporates a tool called UnityYAMLMerge that can merge scene and prefab files in a semantically correct way. The tool can be accessed from the command line and is also available to third-party version control software. If you are using Unity 5 or later, you can use the editor’s Smart Merge (a.k.a, “Unity YAML Merge”).
- Off: use only the default merge toolset in the preferences with no smart merging.
- Premerge: enable smart merging, accept clean merges. Unclean merges will create premerged versions of base, theirs and mine versions of the file. Then, use these with the default merge tool.
- Ask: enable smart merging but when a conflict occurs, show a dialog to let the user resolve it (this is the default setting).
Setting up UnityYAMLMerge for Use with Third Party Tools
The UnityYAMLMerge tool is shipped with the Unity editor; assuming Unity is installed in the standard location, the path to UnityYAMLMerge will be:
C:\Program Files\Unity\Editor\Data\Tools\UnityYAMLMerge.exe
or
C:\Program Files (x86)\Unity\Editor\Data\Tools\UnityYAMLMerge.exe
…on Windows and
/Applications/Unity/Unity.app/Contents/Tools/UnityYAMLMerge
…on Mac OSX (use the Show Package Contents command from the Finder to access this folder).
UnityYAMLMerge is shipped with a default fallback file (called mergespecfile.txt, also in the Tools folder) that specifies how it should proceed with unresolved conflicts or unknown files. This also allows you to use it as the main merge tool for version control systems (such as git) that don’t automatically select merge tools based on file extensions. The most common tools are already listed by default in mergespecfile.txt but you can edit this file to add new tools or change options.
Setting SmartMerge for Git
Add the following text to your .git or .gitconfig file:
    [merge]
    tool = unityyamlmerge

    [mergetool "unityyamlmerge"]
    trustExitCode = false
    cmd = '<path to UnityYAMLMerge>' merge -p "$BASE" "$REMOTE" "$LOCAL" "$MERGED"
Setting SmartMerge for SourceTree: A free visual Git client for Mac and Windows
- Go to Tools > Options > Diff.
- Select Custom in the Merge Tool dropdown.
- Type the path to UnityYAMLMerge in the Merge Command text field.
- Type
merge -p $BASE $REMOTE $LOCAL $MERGEDin the Arguments text field.
Zinject: Dependency Injection Framework for Unity3D
Fortunately, a code-centric approach to Unity development (ex., via Zenject) can minimize these kinds of problems, while also supporting numerous software development best practices that are often lacking in Unity development.
Zenject is a lightweight dependency injection framework built specifically to target Unity 3D (however it can be used outside of Unity as well). It can be used to turn your application into a collection of loosely-coupled parts with highly segmented responsibilities. Zenject can then glue the parts together in many different configurations to allow you to easily write, re-use, refactor and test your code in a scalable and extremely flexible way.
Conclusion
You should now be able to use Git to version control a Unity project as you normally would:
- Any changes detected by Git will be legitimate, not noise generated by the editor.
- You will be able to commit your changes to your repo confidently, without fearing that the project will suddenly break when a team member tries to fetch it or you switch branches.
- Your large binary files can be tracked without slowing down or cluttering your repository.
- Changes to files generated by Unity (such as Scene files) will have diffs that can be inspected normally, and merge conflicts can (at least in theory) be resolved manually.