
Plan Structure From the Very Beginning of Your Project
You might be wondering why you need to think about good structure at the very beginning of a project? Well for starters its good discipline, the more you do it the more natural it becomes and it will eventually save you time. Building multiple projects on a similar well-designed foundation also makes it easier to swap between projects. But the most compelling reason this lazy programmer has to design early is that if the prototype is already built with a good system design it’s super easy to just roll that on into a production project.
When software gets bigger, it becomes difficult to maintain that’s a fact. Here’s the trick, if you don’t maintain it earlier and keep it organized, you’ll have a hard time later on and will find yourself wasting time organizing the mess rather than focusing on features. These are a set of best practices we’ve found from our own experience and a number of other sites.
Process
1. Avoid branching assets: There should always only ever be one version of any asset. If you absolutely have to branch a prefab, scene, or mesh, follow a process that makes it very clear which is the right version. The “wrong” branch should have a funky name, for example, use a double underscore prefix: __MainScene_Backup.
2. Each team member should have a second copy of the project checked out for testing: if you are using version control. After changes, this second copy, the clean copy, should be updated and tested. No-one should make any changes to their clean copies. This is especially useful to catch missing assets.
3. Consider saving levels in XML instead of in scenes:
- It makes it unnecessary to re-setup each scene.
- It makes loading much faster (if most objects are shared between scenes).
- It makes it easier to merge scenes.
- It makes it easier to keep track of data across levels.
4. Try to keep it short & simple: Take a small piece of your code and think: “How a kick-ass solution for that should look like?”. Try to keep your classes with few lines. A small class should have less than 100 lines. A mid-class, less than 400 lines. And the main classes less than 1000 lines. If you are passing this numbers, you are probably creating a god class and we really want to avoid that.
Folder Structure & Scene Organization
Folder structure helps your teammates to modify/search/ organize project and resources in parallel development. There are lots of ways to do this, and we will give some examples of things we have seen work well. But, really, use whatever works for you. If your project layout has good answers to the following questions, it is probably a pretty good layout.
- Who made this?
- What type of thing is this? Script, Audio, Art, Design?
- What area of the project scope does this cover?
- How expensive a given asset is, and how much other data you might need to touch if you change it.
- Is data coherent? Is a prefab or a character near the model that it comes from or the animation clips that go with it?

Streaming Assets:
Most assets in Unity are combined into the project when it is built. However, it is sometimes useful to place files into the normal filesystem on the target machine to make them accessible via a pathname. An example of this is the deployment of a movie file on iOS devices; the original movie file must be available from a location in the filesystem to be played by the PlayMovie function.
Any files placed in a folder called StreamingAssets (case-sensitive) in a Unity project will be copied verbatim to a particular folder on the target machine. You can retrieve the folder using the Application.streamingAssetsPath property. It’s always best to use Application.streamingAssetsPath to get the location of the StreamingAssets folder, as it will always point to the correct location on the platform where the application is running.
The location of this folder varies per platform. Please note that these are case-sensitive:
- On a desktop computer (Mac OS or Windows machine) the location of the files can be obtained with the following code:
path = Application.dataPath + "/StreamingAssets"; - On iOS, use:
path = Application.dataPath + "/Raw"; - On Android, use:
path = "jar:file://" + Application.dataPath + "!/assets/";
Unity gives you total freedom. That’s why it can frequently get messy. and since we can’t talk about the organization without a proper project folder structure. here is the one we use in our practice.
  |-- Assets
        |-- Animations
        |   |-- 2DAnimations
        |   |-- 3DAnimations
        |-- Editor           //Special Folder
        |-- Media
        |   |-- Audio
        |   |-- Video
        |-- Models
        |-- Materials
        |-- Plugins          //Special Folder
        |   |-- Android
        |   |-- iOS
        |   |-- Special
        |-- Prefabs
        |-- Resources        //Special Folder
        |   |-- Android
        |   |-- iOS
        |   |-- Common
        |-- Scenes
        |   |-- Levels
        |   |-- Others
        |-- Scripts
        |   |-- Editor
        |-- Shaders
        |-- StreamingAssets  //Special Folder
        |-- SandBox
        |-- Sprites
Some Important points to remember:
- Don’t use spaces in file and folder names, as we Unity3D command line tools can’t automatically process paths with spaces.
- Do not store any asset files in the root directory. Use subdirectories whenever possible.
- Do not create any additional directories in the root directory, unless you really need to.
- Be consistent with naming. If you decide to use camel case for directory names and low letters for assets, stick to that convention.
- Use separate ‘Third_Party folder’ to store assets imported from the Asset Store. They usually have their own structure that shouldn’t be altered.
- Use ‘SandBox’ directory for any experiments you’re not entirely sure about. When you’re working on a project with other people, create your personal Sandbox subdirectory like: ‘SandBox/San’
Scene hierarchy structure
Next to the project’s hierarchy, there’s also scene hierarchy. As before, we’ll present you a template. You can adjust it to your needs.
- Lights
- Cameras
- AR_Manager
- World
- GUI
- Scene_Manager
- _Dynamic
Some Important points to remember:
- Use named empty game objects as scene folders. Carefully organize your scenes to make it easy to find objects. All empty objects should be located at 0,0,0 with default rotation and scale.
- When you’re instantiating an object in runtime, make sure to put it in _Dynamic – do not pollute the root of your hierarchy or you will find it difficult to navigate through it.
- Put maintenance prefabs and folders (empty game objects) at 0 0 0. If a transform is not specifically used to position an object, it should be at the origin. That way, there is less danger of running into problems with local and world space, and the code is generally simpler.
- Put character and standing object pivots at the base, not in the centre. This makes it easy to put characters and objects on the floor precisely. It also makes it easier to work with 3D as if it is 2D for game logic, AI, and even physics when appropriate.
- Make all meshes face in the same direction (positive or negative z axis). This applies to meshes such as characters and other objects that have a concept of facing direction. Many algorithms are simplified if everything have the same facing direction.
- Get the scale right from the beginning. Make art so that they can all be imported at a scale factor of 1, and that their transforms can be scaled 1, 1, 1. Use a reference object (a Unity cube) to make scale comparisons easy. Choose a world to Unity units ratio suitable for your game/project, and stick to it.
- Make the game/project runnable from every scene. This drastically reduces testing time. To make all scenes runnable you need to do two things: First, provide a way to mock up any data that is required from previously loaded scenes if it is not available. Second, spawn objects that must persist between scene loads with the following idiom:
myObject = FindMyObjectInScene();
|
Use version control system (VCS) inside Unity
![]() You may already know something about GIT, Subversion or any other VCS out there. As a matter of fact, “knowing something” is only a small piece of what you may learn. You should focus on learning about important but infrequently used features of VCS of your choice.
You may already know something about GIT, Subversion or any other VCS out there. As a matter of fact, “knowing something” is only a small piece of what you may learn. You should focus on learning about important but infrequently used features of VCS of your choice.
Why? Mostly because VCS systems are much more powerful than you think, and unfortunately many users are using these as nothing more than a backup and synchronized solutions.
Setting up External version control system with Unity:
You’ll find that, in any ordinary Unity project, there are quite a lot of files and folders, good news that only three folders should be kept under source control: Assets, Packages, and ProjectSettings. Others are generated from these three (mentioned below in green color font).
Here is a quick overview of all files and folders.
- Assets – folder where all game resources are stored, including scripts, textures, sound, custom editors etc. Definitely the most important folder in your project.
- Library – local cache for imported assets, when using external version control system should be completely ignored.
- Packages – This folder contain the manifest file in JSON format used to maintain dependencies link.
- ProjectSettings – in this folder Unity stores all project settings like Physics, Tags, Player settings etc. In other words, everything you set up from Edit → Project Settings set of menus goes into this folder.
- Temp – folders for temporary files generated during build, first one used by MonoDevelop, second – by Unity.
- ProjectName.sln – solution files for IDEs like Visual Studio.

Before checking your project in, you have to tell Unity to modify the project structure slightly to make it compatible with storing assets in an external version control system. This is done by
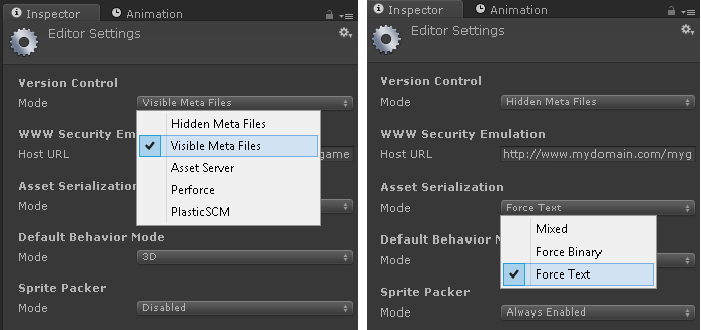
- Switch to Visible Meta Files in Edit → Project Settings → Editor → Version Control Mode → Visible Meta Files.
- Switch to Force Text in Edit → Project Settings → Editor → Asset Serialization Mode
This will show a text file for every asset in theAssetsdirectory containing the necessary bookkeeping information required by Unity.
The files will have a .meta file extension with the first part being the full file name of the asset it is associated with. Moving and renaming assets within Unity should also update the relevant .meta files. However, if you move or rename assets from an external tool, make sure to synchronize the relevant .meta files as well.
Example: Creating a new project and importing it to VCS (GIT) repository
- Create a new project inside Unity and name it, here
ReverieSample. You can add any initial assets here or add them later on. - Enable Visible Meta files in Edit->Project Settings->Editor
- Switch to Force Text in Edit → Project Settings → Editor → Asset Serialization Mode
- Quit Unity (this ensures that all the files are saved).
- IMP: Set up an ignore (.gitignore) filter for the unnecessary folders and files.
- Import the project inside VCS either using GUI tool or Command line and push the same over VCS remote/local Repository.
- Check out the project back from VCS repo and check that the
Assets,PackagesandProjectSettingsdirectory are versioned. - Open the checked out project with Unity. Opening the project will recreate the
Librarydirectory and other necessary files and directories. - Finally, you are free to make and commit the changes. The project should now be set up and ready.
When checking the project into a version control system, you should add the,Assets,Packages and the ProjectSettings directories to the system. The Librarydirectory should be completely ignored – when using .meta files, it’s only a local cache of imported assets. When creating new assets, make sure both the asset itself and the associated .meta file is added to version control.
IMP NOTE: Each team member should have a second copy of the project checked out for testing if you are using version control. After changes, this second copy, the clean copy, should be updated and tested. No-one should make any changes to their clean copies. This is especially useful to catch missing assets.
Make sure to add ‘.gitignore’ File: http://www.arreverie.com/blogs/wp-content/uploads/resources/.gitignore
Sample Project with Architecture and gitignore: https://github.com/sankyprabhu/UnityResearch/tree/master/ReverieSample
Prefabs
Use prefabs for everything: Prefabs in Unity are the best thing you will find to share pre-configured hierarchies of objects. Generally speaking, try to prefab everything that you put on your scenes. This makes it easier to make changes that don’t require the scene to change.
The reason why you should use prefabs is that when a prefab changes, all the instances change too. Have 100 levels and want to add a camera effect on all of them? Not a problem! If your camera is a prefab, just add a camera effect to the camera prefab!
Use separate prefabs for specialization; do not specialize instances. If you have two enemy types, and they only differ by their properties, make separate prefabs for the properties, and link them in. This makes it possible to
- make changes to each type in one place
- make changes without having to change the scene.
Link prefabs to prefabs; do not link instances to instances. Links to prefabs are maintained when dropping a prefab into a scene; links to instances are not. Linking to prefabs whenever possible reduces scene setup, and reduce the need to change scenes.
As far as possible, establish links between instances automatically. If you need to link instances, establish the links programmatically. For example, the player prefab can register itself with the GameManager when it starts, or the GameManager can find the Player prefab instance when it starts.
Don’t put meshes at the roots of prefabs if you want to add other scripts. When you make the prefab from a mesh, first parent the mesh to an empty game object, and make that the root. Put scripts on the root, not on the mesh node. That way it is much easier to replace the mesh with another mesh without loosing any values that you set up in the inspector.
Class Design
Use singletons for convenience. The following class will make any class that inherits from it a singleton automatically:
public class Singleton<T> : MonoBehaviour where T : MonoBehaviour { protected static T instance; /** Returns the instance of this singleton. */ public static T Instance { get { if(instance == null) { instance = (T) FindObjectOfType(typeof(T)); if (instance == null) { Debug.LogError("An instance of " + typeof(T) + " is needed in the scene, but there is none."); } } return instance; } } } |
Singletons are useful for managers, such as ParticleManager or AudioManager or GUIManager.
- Avoid using singletons for unique instances of prefabs that are not managers (such as the Player). Not adhering to this principle complicates inheritance hierarchies, and makes certain types of changes harder. Rather keep references to these in yourGameManager (or other suitable God class )
- Define static properties and methods for public variables and methods that are used often from outside the class. This allows you to write GameManager.Player instead of GameManager.Instance.player.
For components, never make variables public that should not be tweaked in the inspector. Otherwise, it will be tweaked by a designer, especially if it is not clear what it does. If it seems unavoidable, use [HideInInspector] tag. Don’t set things to public to make them appear in the inspector. Only properties or members that you want to alter from outside your class should be public. Instead, use the [SerializeField] (@SerializeField) attribute to make variables show in the inspector. If you have something that needs to be public but not designer editor then use [HideInInspector] (@HideInInspector). On the same note, don’t make things public just for the fun of it. The more public functions and member variables you have in a class, the more stuff shows up in the drop-down list when you try to access it. Keep it clean.
Don’t use strings for anything other than displayed text. In particular, do not use strings for identifying objects or prefabs etc. One unfortunate exception is animations, which generally are accessed with their string names.
Avoid using public index-coupled arrays. Define a class that encapsulates all the variables, and make an array of that: The code looks neater, but most importantly, it is harder to make mistakes in setting up the data in the inspector.
| [Serializable] public class Weapon
{ public GameObject prefab; |
Group data in serializable classes to make things neater in the inspector. Some entities may have dozens of tweakable. It can become a nightmare to find the right variable in the inspector. To make things easier, follow these steps:
- Define separate classes for groups of variables. Make them public and serializable.
- In the primary class, define public variables of each type defined as above.
- Do not initialize these variables in Awake or Start; since they are serializable, Unity will take care of that.
- You can specify defaults as before by assigning values in the definition;
This will group variables in collapsible units in the inspector, which is easier to manage.
| [Serializable] public class MovementProperties //Not a MonoBehaviour! { public float movementSpeed; public float turnSpeed = 1; //default provided } public class HealthProperties //Not a MonoBehaviour! { public float maxHealth; public float regenerationRate; }public class Player : MonoBehaviour { public MovementProperties movementProeprties; public HealthPorperties healthProeprties; } |
If you have a lot of story text, put it in a file. Don’t put it in fields for editing in the inspector. Make it easy to change without having to open the Unity editor, and especially without having to save the scene.
Documentation
Document your setup. Most documentation should be in the code, but certain things should be documented outside code. Making designers sift through code for setup is time-wasting. Documented setups improved efficiency (if the documents are current). In my opinion, it’s always better to maintain ‘README.txt’ file inside your project repository.
Document the following:
![]()
- Detailed Block diagram & Flow diagram of the project which will help to understand project architecture.
- Script details and some information about coding standards followed in the project.
- Layer uses (for collision, culling, and raycasting – essentially, what should be in what layer).
- Tag uses.
- GUI depths for layers (what should display over what).
- Scene Setup details.
- Idiom preferences.
- Prefab structure.
- Animation layers and Animation frame related information.
Naming Standard
Consistent naming and folder structure makes it easier to find things, and to figure out what things are.
Naming General Principles:
- Call a thing what it is. A bird should be called Bird.
- Choose names that can be pronounced and remembered. If you make a Mayan game, do not name your level QuetzalcoatisReturn.
- Be consistent. When you choose a name, stick to it.
- Do not use version numbers, or words to indicate their progress (WIP, final).
- Do not use abbreviations: DVamp@W should be DarkVampire@Walk.
- Use the terminology in the design document: if the document calls the die animationDie, then use DarkVampire@Die, not DarkVampire@Death.
- Keep the most specific descriptor on the left: DarkVampire, not VampireDark; PauseButton, not ButtonPaused. It is, for instance, easier to find the pause button in the inspector if not all buttons start with the word Button.
- Some names form a sequence. Use numbers in these names, for ex. PathNode0, PathNode1. Always start with 0, not 1.
- Do not use numbers for things that don’t form a sequence. For example, Bird0, Bird1, Bird2 should be Flamingo, Eagle, Swallow.
- Prefix temporary objects with a double underscore __Player_Backup.
- Do not use this convention just to distinguish between different types of items, for instance, Rock_Small, Rock_Large should be SmallRock, LargeRock.
- Use underscores between the core name and the thing that describes the “aspect”. For instance:
- GUI buttons states EnterButton_Active, EnterButton_Inactive
- Textures DarkVampire_Diffuse, DarkVampire_Normalmap
- Skybox JungleSky_Top, JungleSky_North
Optimizations & Reducing Memory Usage
1. Cache component lookups:
A simple way to optimize component lookups that occur often is to cache the result. This is helpful for components that don’t change ever but are used often.
For example:
| using UnityEngine; using System.Collections; public class example : MonoBehaviour { Transform thisTransform; public new Transform transform { get { if (thisTransform == null) { thisTransform = base.transform; return thisTransform; } }void Update() { transform.Translate(0, 0, 5); } } |
The latter code will run a lot faster since Unity doesn’t have to find the transform component in the game object each frame. The same applies for scripted components, where you use GetComponent instead of the transform or other shorthand property.
2. Use Built-in arrays:
Built-in arrays are fast, very fast, so use them. While the ArrayList or Array classes are easier to use since you can easily add elements they don’t have nearly the same speed. Built-in arrays have a fixed size but most of the time you know the maximum size in advance and can just fill it out later. The best thing about built-in arrays is that they directly embed struct data types in one tightly packed buffer, without any extra type information or other overhead. Thus iterating through is very easy on the cache as everything is linear in memory.
| using System.Collections; public class example : MonoBehaviour { private Vector3[] positions; void Awake() { positions = new Vector3[100]; int i = 0; while (i < 100) { positions[i] = Vector3.zero; i++; } } } |
3. Don’t use GameObject.Find to locate stuff, have it as a SerializeField and drag it in there instead if you can. Your designers are going to love you for this in the end, even if is a bitch to set up at times.
4. Avoid using foreach(). It calls GetEnumerator() on your list type, which will allocate an enumerator on the heap just to throw it away. You’ll have to use the more verbose C++-style for(;;) syntax.
5. Avoid strings. Strings are immutable in .NET and allocated on the heap. You can’t manipulate them in-place like C. For UI, use StringBuilder to build up strings in a memory-efficient manner, delaying the conversion to string until as late as possible. You can use them as keys because literals should point to the same instance in memory, but don’t manipulate them too much.
6. Use structs. Struct types in mono are allocated on the stack, so if you have a utility class that won’t leave scope, make it a struct. Remember structs are passed by value, so you will have to prefix a parameter with ref to avoid any copy costs.
7. Minimise use of function pointers. Putting a class method in a delegate or a Func<> causes it to be boxed, which triggers an allocation. I can’t find any way to store a link to a method without boxing. I’ve left most of my function pointers in there because they’re a massive boon to decoupling, and I’ll just have to live with the allocs, but I’ve removed some.
Conclusion
So this is the end of the beginning. I’ve just given a brief overview of how I handle structure. What works for us might not work for you so don’t be afraid to adapt things to suit your own preferences. The approach I used to get to here is to try something, tweak what doesn’t work, then try again. Put your heart, mind, and soul in the project even your smallest acts. This is the secret of success.
Best Luck 🙂
Pingback: Unity Project Structure - Samuel Asher Rivello
Hello, I honestly don’t understand why there are no comments and only few likes.
This should be a first thing any developer needs to read before starting any project. Again, and again. And again!
Thank you very much for your great article. It helps me a lot!
What a great article, thank you so much for sharing!
Very helpful, thanks a lot!
Thx for these awesome tips! we are in 2020. I’m not sure if the following code for windows is correct: path = Application.dataPath + “/StreamingAssets”
Because the combination can include \ and / mix up. You can use @ or \\. Double-check that and update if necessary.
This is very helpful, thank you very much. I do have some questions, if you don’t mind:
– Just curious: Is there a reason you use a while loop, not a for loop to assign the 100 Vectors?
– Why are you assigning the vectors in the first place? Vectors are none-nullable, so every slot from the beginning ist new Vector3()
– I’m not sure why the { public new Transform transform… } is faster. Tbh I also didn’t know Unity had to look up the transform each time it was called, but your method introduces a null check for every frame.
– would you prefer the Singleton inheritance method over { static MyClass m_Instance; public static MyClass GetMyClass() return m_Instance }? I’m not sure which is faster, but personally I’d prefer less inheritance.
Pingback: Unity 项目文件夹结构及命名规范 – Shaojie
Pingback: Coding Guideline For Unity C# - myunity.dev
This is very useful, exactly the orientation I’ve been trying to find.